Sleuth Kit and Autopsy
Sleuth Kit and Autopsy are investigation tools for Digital Forensics. Autopsy Forensics Browser is a graphical interface to the command line digital investigation analysis tool in Sleuth Kit. Like other Disk Analysis tools like Photo Rec and Foremost, this tool will be used for recovering the lost files from the file system. It can be run both in Windows and Linux. First download the files from the website.
1. Autopsy
2. Sleuth Kit
After the download extract the files into a directory.
1. First get into the Sleuth Kit directory.
2. Run the configure file. P.S: This should be run without any errors
3. Then run the make command. This may take some time 🙂
4. Then type make install, you should be a super user to run this command
shankie@ubuntu:~/Desktop/Download/Tools$ cd sleuthkit-4.0.1/
shankie@ubuntu:~/Desktop/Download/Tools/sleuthkit-4.0.1$ ./configure
shankie@ubuntu:~/Desktop/Download/Tools$ make
shankie@ubuntu:~/Desktop/Download/Tools/sleuthkit-4.0.1$ sudo make install
Sleuth Kit Configuration is finished next moving to Autopsy,
1. Get into the autopsy folder
2. Run the configure file. If you run it, it will prompt for the NIST NSR library hash file configuration and press no for it. Next prompt will be regarding the Evidence Locker directory path. Autopsy saves the configuration files, logs, output everything in this directory. Create a directory of your own name and provide it’ path name in the prompt. I am creating a directory with name “Evidence_Locker” in my home directory.
shankie@ubuntu:~/Desktop/Download/Tools$ cd autopsy-2.24/
shankie@ubuntu:~/Desktop/Download/Tools/autopsy-2.24$ ./configure
3. Creating the Evidence Locker folder. P.S:
shankie@ubuntu:~$ mkdir Evidence_Locker
shankie@ubuntu:~/Evidence_Locker$ pwd
/home/shankie/Evidence_Locker
P.S: Paste your path name of the directory in the prompt. This is mine :p
Enter the directory that you want to use for the Evidence Locker:

/home/shankie/Evidence_Locker
Yep, you are done with the installation part! Will execute and see what happens!
shankie@ubuntu:~/Desktop/Download/Tools/autopsy-2.24$ ./autopsy

============================================================================

Autopsy Forensic Browser

http://www.sleuthkit.org/autopsy/

ver 2.24

============================================================================

Evidence Locker: /home/shankie/Evidence_Locker

Start Time: Fri Nov 16 12:02:32 2012

Remote Host: localhost

Local Port: 9999

Open an HTML browser on the remote host and paste this URL in it:

http://localhost:9999/autopsy

Keep this process running and use <ctrl-c> to exit
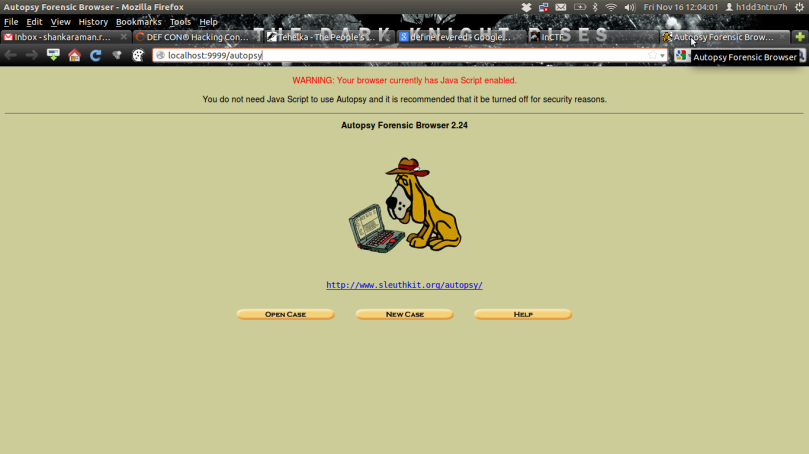
There you go, paste the URL in your browser. Should come like this in your browser

Reblogged this on Techno Krat and commented:
For Forensic Guys this one is good……
Ya, i think this is the only Forensics Browser tool for Linux which offers GUI also!
[…] Ohjeet Sleut Kitin ja Autopsyn asentamiseen löysin täältä: https://shankaraman.wordpress.com/2012/11/16/how-to-install-autopsy-and-sleuthkit-in-ubuntu/ […]
[…] right running ubuntu 14.04 in vmware trying create live cd tool called uck. in process can customize , add together own packages , tools live cd. want install , setup autopsy began process of downloading both sleuthkit , autopsy. while trying install have been told have first have utilize ./configure according guide: https://shankaraman.wordpress.com/2012/11/16/how-to-install-autopsy-and-sleuthkit-in-ubuntu/ […]
Hii.. salam-kenal, postingan nya hebat, sangat inspiratif sekali dan menjadikan kita semua menjadi semangat untuk terus mempost update blog. semog ilmunya bermanfaat untuk se-mua generasi muda. makasih